Hello October One Dish Meal – “Garlic Roasted Chicken & Root Vegetables”

DSC_8398

The best meals are the most simple. They are effortless & comforting in both their preparation and presentation.  Root vegetables…potatoes, carrots, onions, garlic…all roasted along side a small plump chicken…scented with fresh thyme leaves…salted & peppered…cooked in one dish so that all the juices intermingle is one of my favorite meals of this season.

A couple of things of note….Hello October my favortite month and right after my printable recipes I am now adding a section for “sources”…where to find some of the fun things you might see here at Food on Fifth from props to kitchen tools. Let me know what you think.

The vegetables came from the Downtown Nashville Farmer’s Market and the small, plump chicken from my CSA, Fresh Harvest. I buy a few of these organic chickens at one time and  keep them in my freezer so I always have them on hand.

DSC_8379DSC_8381

Well….you can’t, can you?

DSC_8385

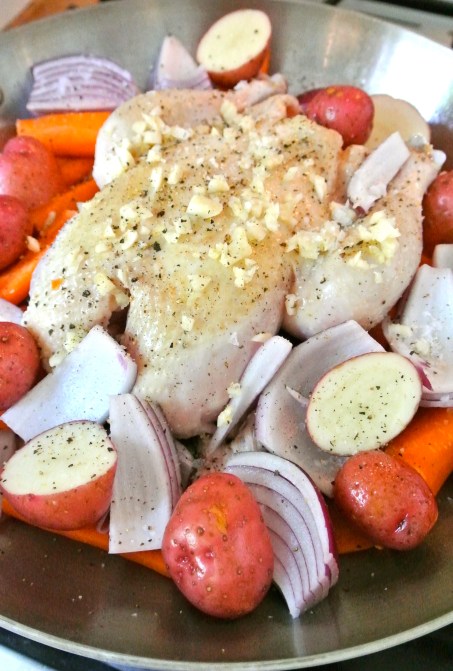
After lightly browning on both sides in some olive oil on top of the stove, I sprinkle lots of chopped garlic over the top, snuggle the potatoes, onions & carrots around the chicken, add a generous grinding of black pepper, fresh thyme leaves and sea salt and it is ready for the oven.

DSC_8398

An hour or so later, golden brown crispy skin, just right softened vegetables & more thyme and our dinner is ready.  A glass of wine and some good crusty bread for sopping the juices…Bring it on October! Make every meal count.

photo 2
iphone image with wine and bread and our one dish dinner.

Quotation-Chicken-Little-day-today-Meetville-Quotes-7915

(quote from the Chicken Little book)


Garlic Roasted Chicken and Root Vegetables

  • Servings: 2-4
  • Difficulty: easy
  • Print

DSC_8398photo 2

Ingredients:

  • One 2-3 lb chicken, organic preferred
  • olive oil
  • 2 tbsp minced fresh garlic
  • 8 small red potatoes
  • 4 carrots, trimmed & peeled
  • 2 red onions, chopped in large pieces
  • fresh thyme sprigs & leaves
  • 1/2 cup water
  • Freshly ground black pepper and sea salt

Directions:

  1. Preheat oven to 350 degrees.
  2. Rinse and pat roasting hen dry inside and out.
  3. Heat olive oil in a pan that can go from stove top to the oven for roasting. Brown the hen on the top and bottom. Turn heat off.
  4. Pat the minced garlic and thyme leaves onto the hen.
  5. Snuggle the vegetables around the hen. Sprinkle over all with a generous amount of black pepper and sea salt.
  6. Pour 1/2 cup water into the pan. Roast for 1 1/2 hour or until the juices from the hen run clear and the root vegetables are cooked al dente soft. Garnish with thyme sprigs.
  7. Serve chicken pieces & vegetables in a bowl with some of the juices, a good crusty baguette for sopping and a glass of decent wine for optimum contentment.

 Making good stuff you see here easy to find:

All-Clad Pan Sauteuse – From Stove-top to Oven – Sur la Table, Williams Sonoma, Macy’s

Mid Century Silver Plate Serving Fork – Nashville Flea Market

Wooden Handle Knife – West Elm, Schmidt Brothers

Flatware, White Bowl, Tablecloth, Wine Glass – Food on Fifth prop collection

“You Can’t Eat Money” Artwork by C.M.L.

“September Tomatoes, Bacon & Spinach Pie with Thyme-Pepper Crust”

tomato pie 2

The September tomatoes…the ripe red ones that hang on vines starting to droop, vines heavy with green tomatoes that will never see red…these ripe homegrowns are the sweetest of the season I think. They are summer’s last gift before it is all a memory.

wee tomato bird

What to do with the last few tomatoes just picked? A BLT…a jar of tomato sauce…a pie? Yes. I love to make pies.  A deep savory pie it will be.

A crust using fresh lemon thyme from my garden along with some freshly ground black peppercorns is where I will start.

 DSC_1595DSC_1596

I am a fan of the springform pan for tarts & pies as well as for cake. A straight sided savory pie is just so beautiful.

DSC_1869DSC_1867

DSC_1874

Thick sliced homegrown tomatoes salted and draining on paper towels before adding to the pie helps pull out some of the water before using. I do not want this pie to be too watery.

DSC_1875

The spinach & ricotta filling  is creamy enough to hold up the next layers.

DSC_1878_2

Filling topped with thick sliced toms and crispy, thick sliced bacon torn into pieces.

DSC_1884

Creamy spinach filling, salty-sweet September tomatoes & crispy bacon. Let’s eat! DSC_1955

September Tomatoes, Bacon & Spinach Pie

  • Servings: 6-8
  • Print

DSC_3215tomato pie 2DSC_1962

Ingredients:

  • 1 1/4 cups unbleached flour with a pinch of salt added
  • 1 stick cold butter cut into small pieces
  • 1 tbsp fresh thyme leaves
  • 1 tsp freshly ground black peppercorns
  • a few tablespoons cold water
  • 1/2 cup crumbled feta cheese
  • 3 med homegrown tomatoes sliced thickly/or 1 large tomato & some cherry toms
  • 1 cup whole fat ricotta
  • 3 large eggs
  • 1 cup fresh spinach steamed, drained & chopped
  • 4 slices thick bacon, cooked crispy & broken into pieces
  • sea salt & freshly ground black peppercorns

Directions:

  1. For crust put the flour, pinch of salt, thyme leaves & pepper in a food processor & pulse a few times. Add cold butter pieces, pulse a few more times until incorporated.
  2. With machine running drizzle in ice-cold water until a dough ball forms. Flatten dough into a disk, wrap in plastic and chill for 30 minutes before rolling out.
  3. In the meantime, place thickly sliced tomatoes on paper towels & sprinkle with some sea or kosher salt. Let sit for 20 minutes. This will pull some of the moisture out of the tomatoes. Right before adding to the pie pat dry again with dry paper towels.
  4. Preheat oven to 350. Roll chilled dough out on a floured board into a circle large enough to fit into & half-way up the sides of  a 9″ springform  pan.
  5. Spray pan bottom & sides with cooking spray. Fit dough into the pan bottom & half way up sides. Crimp and fold to make an even top edge. Set aside.
  6. In a mixing bowl whisk together the ricotta and eggs, 1/2 tsp each salt & pepper,  until fluffy. Stir in drained & chopped spinach. Mix well.
  7. Sprinkle the crumbled feta over the bottom of the dough. Top with the ricotta-spinach mixture. Add tomato slices. Scatter the crispy bacon pieces over all.
  8.  Bake for 35-45 minutes or until puffy & golden brown and center is set. Cover with a sheet of foil if the top starts getting too brown.  Let rest for 20 min. before cutting.

Simple_Simon_1_-_WW_Denslow_-_Project_Gutenberg_etext_18546

Adios, Adieu, Goodbye for Now, “Pear, Blueberry Jam with St. Germain”

DSC_1633

September crept in right on top of the last days of August…it has been tropical…. rainy and humid and hot, windy with bouts of unusually cool days scattered in between. Most of the local fruit is gone…the peaches, berries…plums and now my pears….adieu, adios and goodbye until next year sweet ones.

In the early dark days of fall and winter I will have my consolations on a shelf in my kitchen. A few jars of preserves…peach and plum. Jars of jam…pear and blueberry with a splash of St. Germain will be there, ready to comfort me.

photo 1

Ripe and Ready.

photo 1

The evening before I made this jam I cored, peeled and roughly chopped the pears and tossed them in a bowl with some raw sugar and lemon juice, covered the bowl and refrigerated the fruit overnight.  The sugar and lemon juice help to pull some of the juices from the fruit, breaking the fruit down naturally which shortens the cooking process.

DSC_1327

Do you know about “Pomona’s Universal Pectin”? I like to use this brand as the recipes for  jams, jellies & preserves can be made with less sugar. I do not like cloying sweet preserved fruit so this pectin is just right. The instructions are easy to follow and there are plenty of recipes inside the package. It is preservative free, kosher, vegan, gluten-free and non-gmo. I usually buy it a Whole Foods, but it is available online at their site as well. DSC_1363

I had la few cartons of fresh blueberries left over from a photo shoot so I tossed them in with the peeled and chunked pears. The blueberries gave the finished jam a lovely soft color. A generous splash of St. Germain elderflower liqueur added another layer of goodness.

DSC_1339

You always want to “test” your jam or jelly after cooking to make sure it “sets up”. I do this by spooning some of the mixture out onto a chilled plate. Leave it to sit a few minutes and then check the consistency. This batch “jammed” to perfection.

DSC_1334

Every time I begin to can I feel like a novice….no matter how many times I have done it. This is where I am my most careful-self in the kitchen. I read the instructions, reread and double-check before starting. I gather all my canning supplies, pans, jars, ladles before hand and get everything cleaned, sterilized & all lined up ready to go. My best advice is just do what the recipe & canning instructions say…verbatim…all will be well.

DSC_1343

DSC_1353

DSC_1638

Pears, Blueberries Jam with St. Germain

  • Servings: 6-8 half pints
  • Print

photo 1DSC_1334DSC_1638

Ingredients:

  • 6 cups cored, peeled & chopped pears
  • 3 cups blueberries
  • 2 cups raw/turbinado sugar
  • 1/2 cup Elderflower Liqueur/St. Germain
  • juice of 2 lemons
  • Pkg of Pomona’s Universal Pectin (or other pectin if you prefer, most have easy, simple canning instructions inside the box. I used the directions for canning pears.
  • Equipment: clean 1/2 pint glass canning jars & lids, canning equipment (or if you prefer you can do this jam for the freezer…no hot water bath canning processing required.)

Directions:

  1. The night before you plan to can, mix the pears, sugar & lemon juice in a mixing bowl, cover & refrigerate overnight.
  2. The next day put the pear mixture in a large saucepan. Add 1 cup of water. Bring to a low boil. Add the pectin according to the package directions, turn stove to low simmer. Cook for about 30 minutes stirring often.
  3. The last 10 minutes of cook time add the blueberries & St. Germain. Stir gently.
  4. While fruit is cooking, wash & rinse canning jars in hot water. Set aside to drain on a very clean dish towel. Use new lids & rings. Put these in a pan of hot water until ready to use on low heat. There are many, many methods for hot water bath canning  so use one that works for you.
  5. When jam is almost finished cooking test the jell by spooning some jam mixture onto a chilled saucer, refrigerate for a few minutes. Test to see if the jam is the consistency you prefer. If not continue cooking another 15 minutes.  Remove from heat.
  6. Fill glass jars with hot jam mixture to within 1/4 inch from the top of the glass rim for hot water bath canning process, 1/2 inch for freezer jam. Wipe each jar rim clean before adding lids. When all jars are filled & wiped clean, top with lid and ring.
  7. For hot water bath place filled jars into your canner rack, lower into the canning pan, cover jars with warm water covering by 1 inch. Bring to a boil, process for 10-15 minutes. Turn heat off. Raise jar rack out of the water bath & place jars on a cooling rack. As jam cools you should hear a soft “pop” as each jar seals. If some jars do not seal then refrigerate to use immediately.
  8. For freezer jam after #6 let jars cool down completely & store in the freezer until ready to eat. Remove jars from freezer a few hours before using.