Oven-Roasted Garlic in Olive Oil…for everyday cooking all year long. E.A.T. #51

This is a pantry basic in our kitchen here at Food on Fifth and has been for quite a few years. It’s easy and incredibly useful for everyday cooking. This pantry basic saves a lot of time, while combining two things we start most meals with….olive oil and garlic.

This all started when we were on a photo shoot a few years ago. The food client sent in a gigantic jar of fresh, whole, peeled garlic cloves. There were hundreds in the jar. We only used a few for the recipes we were preparing. We are a group who does not easily toss out good food. The last day we dumped all the garlic into a roasting pan, filled it with olive oil, completely covering the cloves, set the oven on 325 degrees and let the roasting do the rest. 45 minutes later we had a huge pan of perfectly roasted garlic. We let it cool down completely, divided it among canning jars and each of us took home our own little bit of heaven. Did I say how aromatic the studio was? People kept coming back and asking us what that aroma was all day…just garlic.

So now I do this on a regular basis so I always have garlic roasted in olive oil in my fridge. I don’t have access to a gigantic jar of fresh garlic cloves, but a few local import markets have pretty nice sized jars of peeled, fresh garlic as do some larger supermarkets. As I scoop out of the jar to use when cooking, I always add a bit of olive oil back to the jar so the garlic is always covered completely to keep the contents from going “bad”. It works like a charm. It is as easy-as-this every time.

Jars filled with roasted garlic and olive oil, topped off with additional oil. Scoop out a spoonful of garlic and olive oil and add to pasta sauces, smear on a chicken before cooking, on toasted bread with a slice of cheese and avocado…so many uses. When I cook fresh garden peas or beans a dollop gets added to the cooking liquid…I have even tossed a few spoonfuls with hot pasta, then topping with a generous grating of Parmigiana Reggiano, chopped parsley and lots of freshly ground black pepper for a very amazing bowl of pasta. Oh my…so good.
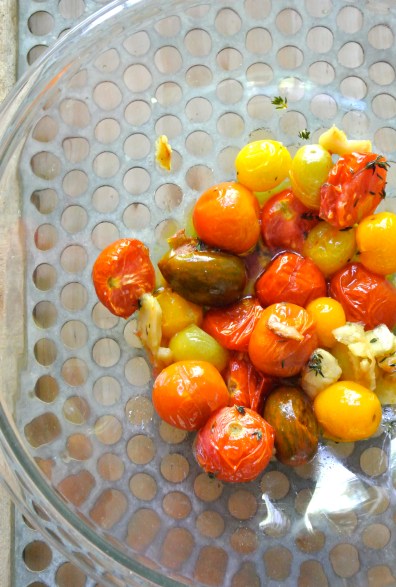
Pantry/refrigerator garlic cloves in olive oil tossed with just-picked baby tomatoes ready for herbs and baking….this quick and easy recipe next post. Stay cool, be safe and be well….take it easy.

Oven-Roasted Garlic in Olive Oil

Ingredients: 3-4 cups fresh, peeled garlic cloves + enough olive oil to cover while roasting + extra oil for jars for storing

Directions: Preheat oven to 325 degrees. Place garlic cloves and enough olive oil to cover them in an oven proof pan. Roast garlic for 30-45 minutes, or until cloves are softened and a light golden brown. Remove pan from oven. Let cool completely. Divide roasted garlic cloves with roasting oil between glass jars. Top off jars with more oil. Cover jars with tight-fitting lids and refrigerate.

I have kept jars of this roasted garlic in olive for months and continually use. Just be sure to top of the jar with enough fresh olive oil to keep cloves submerged/covered between uses.

Gifting? yes this is a great gift for any of your friends who love to cook and love their garlic.

teresablackburnfoodstyling.com

Orange, Garlic and Thyme Roasted Turkey Breasts

DSC_2373

“An empty stomach is not a good political advisor.” Albert Einstein

Eating well takes a bit of time and thought. Usually, for me, more thought than time. These “Orange, Garlic and Thyme Roasted Turkey Breasts” are easy and quick to prepare and cook.  Lots of juicy oranges full of vitamin c, plump garlic cloves, a bit of olive oil, thyme leaves and a pinch of sea salt and freshly ground black pepper…basics that I keep on hand all the time…made this dish all the more easy.

DSC_2353

These are organic turkey breasts which are a bit more expensive, but there is definitely enough for leftovers for lunch sandwiches or a pot of soup the next day. Two meals out of one.

DSC_2358

I thinly sliced garlic cloves,  rubbed the skin with olive oil and added a generous dusting of dried thyme leave to both sides all nestled into a roasting pan with freshly squeezed orange halves left in the pan for more flavor.

DSC_2367

Roasted and sliced orange roasted turkey breasts, along with a salad and crusty baguette (from Dozens Bakery if you live in Nashville) and a glass of your favorite wine is a good dinner to ease into fall.  This could be good for Thanksgiving Dinner for a small gathering of family and friends. Just double or triple the recipe.

DSC_2371

Serve sliced with all the juices and cooked oranges.

Orange, Garlic and Thyme Roasted Turkey Breasts

  • Servings: 2-4
  • Print

Ingredients:

  • 2 organic turkey breasts
  • olive oil
  • a few small oranges like Little Cuties,  or tangerines will work
  • 4 garlic cloves, thinly sliced
  • a generous tablespoon dried thyme leaves
  • sea salt and freshly ground black pepper

Directions:

  1. Wash turkey breasts and pat dry. Rub skin all over with olive oil. Place skin side up in a roasting pan.
  2. Squeeze the juice from about 3 oranges into pan. Cut another 2 or 3 in half and snuggle around turkey breasts to bake along side.
  3. Generously scatter dried thyme leaves over each breast. Season with salt and freshly ground black pepper.
  4. Add thinly sliced garlic cloves over top of each breast. Roast for about 1 hour, at 350 degrees,  or until a meat thermometer inserted into the breast reads 160-165 degrees.
  5. Serve in a deep dish or pan sliced with all the juices and cooked oranges.

Note: double or triple this recipe for a larger group…this is a great buffet entree for the Holidays.

Teresa Blackburn     teresablackburnfoodstyling.com   www.foodonfifth.com


Andalusian Gazpacho – Nashville Style

I am pretty sure the first time I ever had Gazpacho was in the early 70’s. Rather a cool-food of the moment it seemed to show up everywhere at potlucks and restaurants. Mostly chunky with too many onions taking over, and watery, I was never a fan. Over the years I tried the many versions of this Spanish soup that crossed my culinary path. The only vaguely appealing gazpachos were the blended-until-smooth ones…until recently.

I wish I could say the recipe is original, but it is not. On the other hand, I cannot say where it came from as it was cut from a magazine years ago and I recently found it in a file where I used to put such things before iphones and scanners. So I made this classic Andalusian Gazpacho a couple of weeks ago using Nashville homegrown tomatoes. I want to thank the cook who came up with this recipe and I want to thank them for converting me. Full of summer goodness.

Ingredients stuffed into my food processor…….

…and in a few seconds becoming creamy goodness.

I ate it for days. I froze some for later. August is a hot month calling for cooling foods. There’s a bumper crop of local tomatoes and cucumbers right now in the farmer’s markets. This soup is a good way to use those too-ripe-to-slice tomatoes as well.

Andalusian Gazpacho-Nashville Style

Ingredients:

  • 4-5 very ripe tomatoes, cored and chopped
  • 1/2 English cucumber, peeled, seeded and chopped (can use a home-grown as well)
  • 1/4 cup chopped red onion
  • 1 garlic clove
  • 1/2 cup toasted slivered or sliced almonds
  • 1/3 cup water
  • 2-3 tablespoon sherry or red wine vinegar
  • 3 tablespoons good olive oil, plus more for drizzling
  • Sea salt and freshly ground black pepper to taste
  • Optional: shredded cucumber for garnish

Directions:

  1. Put all the ingredients into a food processor or blender and process until very smooth.
  2. Taste and adjust seasonings. Chill in a glass container with a lid until ready to serve.
  3. To serve drizzle with additional olive oil. Top servings with shredded cucumber if you wish.

A September of Turbulent Times, Simple Servings, Hunger Action

These past few weeks have been unsettling. There is hardly an hour of any day that goes by that there is not another story of worldwide familial sadness confronting us. The Syrian diaspora alone is mind and heart wrenching. The details grim and unnerving.

While following these international events my mind always turns to practical matters. Food and water. Very simple and practical. I ponder the overabundance that is so unevenly distributed. I ponder how much I have and wonder how much I need. These are turbulent times and times for questionings…personal assessments of what is good for the most and how my actions affect everything else I come into contact with.

I received an invitation recently to an upcoming food event where for $500 I can have the privilege of hobnobbing with well-known chefs and food glitterati. I also received another invitation a few days later to make a donation to Second Harvest Food Bank to take action against hunger in Middle Tennessee. I have made my choice…I will not be hobnobbing, not that I am against it if that is your thing, but will at the same time encourage you to perhaps hobnob one day and consider Second Harvest Food Bank of Middle Tennessee for another. If you choose here is where to make a donation.

FullSizeRender FullSizeRender FullSizeRender

My recipe offering is a simple serving using three ingredients, locally grown okra, sea salt & olive oil. Roasted Okra Pods can be cooked in an oven, in a heavy stove-top cast iron skillet or on the grill. When roasted the okra becomes a bit crisp  and has none of the so-called sliminess that is often associated with okra cooked by other methods.

Roasted Okra Pods

  • Servings: 2-4
  • Print

IMG_8852

Ingredients:

  • 1/2 lb firm, fresh whole okra pods, rinsed & patted dry
  • Olive oil
  • Crunch sea salt or kosher salt

Directions:

  1. Preheat oven to 400 degrees.
  2. Put dry okra pods on a sheet pan covered with parchment paper. Drizzle somewhat generously with olive oil. Toss to coat with your hands. Spread okra out on sheet pan in a single layer. Scatter sea salt over okra.
  3. Roast okra for 12 to 15 minutes. Remove from oven to cool a few minutes and serve.

Teresa Blackburn    http://www.teresablackburnfoodstyling.com

http://www.foodonfifth.com

 Think, Cook, Share.

“A Simple Sauce, Dave’s Tomatoes & an Ode by Pablo Neruda”

DSC_9694

My son-in-law, David,  has the magic touch when it comes to growing almost anything. He plants casually like a seasoned farmer. He does not fuss or worry, but accepts that things will grow, or not, depending on the weather. Tomatoes grow well for him in bad years, but this year, a good year, his plants are laden. He and my daughter, Whitney, are very generous with their bounty. See the big beauties above? Yep, those are David’s Cherokee Purple tomatoes.

 Vine ripened, just picked tomatoes. I am moved by their shapeliness, their innate lack of sameness and their color wheel of “reds, oranges & pinks”.

This is my favorite hot-summer, no-cook tomato sauce. It can only be made “right now” with just picked Summer tomatoes. Fresh, no fuss, quick and just plain good.

Fresh Tomato and Basil Sauce

You only need a few ingredients….Fresh homegrown tomatoes, a few basil leaves, toasted pine nuts, smashed garlic cloves, a good fruity olive oil, salt & pepper, a splash of red wine vinegar and just grated Parmesan cheese to scatter over the top.

DSC_9706

If you live in Nashville stop by Lazzaroli’s on 5th Avenue North in Historic Germantown. Tom has an amazing selection of olive oils. I picked up this bottle of Madonna Olive Oil especially for this dish. It’s amazing.

DSC_9704DSC_9712

Cook up some pasta al dente.

DSC_9721

Toss the sauce with the pasta, scatter Parmesan over the top…stay cool, eat well.

DSC_9727

 “Ode to Tomatoes” by Pablo Neruda

 …..at the midpoint
of summer,
the tomato,
star of earth,
recurrent
and fertile
star,
displays
its convolutions,
its canals,
its remarkable amplitude
and abundance,
no pit,
no husk,
no leaves or thorns,
the tomato offers
its gift
of fiery color
and cool completeness.


No-Cook Fresh Summer Tomato Sauce for Pasta

  • Servings: 2
  • Difficulty: very easy
  • Print
Fresh Tomato and Basil Sauce
Ingredients:
  • 2 Large or 4 smaller size vine-ripened Tomatoes, cored & chopped
  • a small handful of fresh Basil leaves, roughly chopped
  • 1/2 cup toasted pine nuts
  • 2 garlic cloves, pressed through a garlic press
  • 1/3 cup good quality fruity olive oil
  • 2 TBSP red wine vinegar
  • Freshly ground black pepper and sea salt
  • Freshly grated Parmesan Cheese

Directions:


  1. Add the chopped tomatoes, chopped basil, pine nuts & garlic to a mixing bowl
  2. Pour in olive oil & vinegar and toss well.
  3. Season with salt & pepper. Taste and adjust seasoning to your liking.
  4. Chill until ready to serve covered.
  5. Serve with a generous sprinkling of Parmesan, a crusty loaf to sop the juices on your plate and your favorite summer wine.

Notes: Unlike a cooked sauce, this is just a mouthful of summer. I have been making this for years and only eat it in the middle of tomato season. Some dishes have to wait for the right season to enjoy, such is this one.

Any homegrown tomatoes will work great. I used some of my baby tomatoes in this dish to add texture.  Probably 2 lbs of tomatoes would be good for this recipe for two servings. Just increase to feed more.

Homegrown Tomatoes & Bread, Roasted & Toasted Salad

Heirloom tomatoes

“Homegrown tomatoes, homegrown tomatoes
What’d life be without homegrown tomatoes
Only two things that money can’t buy
And that’s true love and homegrown tomatoes”

(“Homegrown Tomatoes” was written by Guy Clark, go to end of post for You Tube video)

That about says it all doesn’t it?
I remember the first time I ever heard Guy Clark sing this song and I was just thrilled…here was someone writing songs about real things that I knew about.  I am still sure to this day that I know lots more about tomatoes than love! Love and homegrown tomatoes which is something none of us can get to much of. Isn’t that the truth?
Middle Tennessee is having a bumper crop of tomatoes. My own little “gardenette” has lots of ‘maters on the vine…in all stages of ripeness. Here is a salad I tossed together last weekend with some of my wee homegrowns, lemon thyme, Genovese basil leaves just picked.

I cut the larger wee tomatoes in half and put them all on a baking sheet, drizzling good olive oil and sprinkling with crunchy sea salt.

Tomatoes ready for roasting

As an afterthought I added a few garlic cloves & some thyme sprigs.

heirloom tomatoes ready for roasting

20 minutes or so of roasting at 400 degrees F does the trick. The tomatoes become slightly browned and collapse somewhat. The garlic is mashably soft. Into a bowl they go.

Roasted Tomatoes

I cut the dried baguette into large chunks & placed it on the same roasting pan with the leftover garlic & thyme pieces. Pop this back into the oven for a few minutes to crisp. I let the bread cool slightly before tossing in the bowl with the tomatoes. This salad is best made ahead to let the bread soak up some of the juice and chilled or served at room temperature.

Roasted Tomato & Bread Salad

The evening we ate this salad for supper it was 93 degrees here in Nashville.

This simple tomato and bread salad, sometimes referred to as a Panzanella salad, served with a bottle of crisp, cold wine had the needed cooling effect. This heat we have been having is “nothin’ a homegrown tomato won’t cure”.

Panzanella Salad

Homegrown Tomatoes & Crispy Bread Salad

  • Servings: 4
  • Print

tomatoes

Ingredients:

  • 1 lb of homegrown tomatoes, small or large cut into smaller pieces
  • fresh thyme & basil leaves
  • 3 cloves peeled garlic
  • sea salt & freshly ground black pepper
  • good quality olive oil
  • 2 tbsp red wine vinegar
  • freshly grated Parmesan Cheese for finishing off
  • additional basil leaves for garnish
  • “Old” Bread…baguettes work great, cut into cubes

Directions:

  1. Preheat oven to 400 degrees F.
  2. Scatter tomatoes on a baking sheet, add garlic cloves & thyme sprigs.
  3. Drizzle generously with olive oil. Dust with sea salt & black pepper.
  4. Put pan in hot oven & roast tomatoes for about 20 minutes or until they just begin to char & collapse. Remove from oven & scrape tomatoes & juices into a bowl.
  5. Add red wine vinegar & about 1/2 cup torn basil leaves into the bowl & toss well.
  6. Add bread cubes to the same baking pan, toss bread in any leftover oil. Bake for about 5 minutes to crisp. Remove from oven. Let cool.
  7. Add cooled bread to the mixing bowl with the tomatoes & basil. At this point you can serve at room temp or pop in the refrigerator to chill for later.
  8. To serve add a generous portion of freshly grated parmesan cheese & more torn pieces of basil and a glass of cold, crisp white wine!

recipe and photos by Teresa Blackburn      foodonfifth.com    teresablackburnfoodstyling.com  

photo 1

Click on the below link for Guy Clark singing “Homegrown Tomatoes”.