I am not a fussy cook. I find cooking, especially baking, very soothing. Keeping it simple and easy is my approach…some of it is intuitive but mostly not being afraid of the possibilities of missteps. It helps to be intrepid but it is not necessary. A good sense of humor helps as well! Many holiday days you can find me in my kitchen trying out new recipes and just playing around and this July 4th is no exception.
This recipe for my “Blueberry-Apricot Slab Tart” is very easy. Don’t you think the “slab” part is appropriate? The directions are easy, not many ingredients are needed and you can substitute the fruit as you like…peaches, blackberries, strawberries, cherries, plums are good substitutes.
A homemade or store-bought pie crust works equally well depending on how much time you have. I make my own crusts and when I do, I make extras and freeze to use later. This crust is one of my freezer crusts thawed, rolled out and topped with Creme Fraiche mixed with raw sugar and lemon juice then scattered with zest.
Apricots sliced, no peeling necessary. Blueberries nestled all around…..
….star shapes cut out of the pastry scraps and a dusting of decorating sugar this tart is ready for the oven! Easy-as-This!
This week they arrived, plump, sweet and plentiful. Those small, round baby berries. Tennessee Strawberries. Just in time for Mother’s Day. I made this tart with the first ones I purchased after eating half the carton one-by-one.
I have never been a big fan of cooked strawberries as in strawberry pie or strawberry cobblers. Something about the berries becoming “mushy” during the cooking process just doesn’t appeal to my palate. This tart is different. The berries stay firm and keep their color, they do not get mushy nor discolored. It has a wonderful crispy crust that doesn’t get soggy on the bottom. With only a few ingredients it is quick and easy, beautifully rustic and will just make you, or your mother, very happy bite-by-bite.
This is what a really fresh, ripe, just picked locally grown Tennessee Strawberry looks like up close. Not perfect, not dark red and very red inside as well as outside. They are fragrant. Here are some places you can go and pick your own berries in Middle Tennessee if you like. I am pretty happy to let others do the picking for me. These berries came from the Downtown Nashville Farmer’s Market.
Sliced strawberries &almonds mixed in with sugar and cornstarch is the easiest filling.
Four ingredients is all that is needed for this crust. If you are in a big hurry you can, of course, use a refrigerator roll-out dough. In a food processor my crust takes about 5 minutes to make. Give it a try.
Warm from the oven…..
….come on…get a bit closer…let’s have a bite. Share some with your Mom, or someone else’s Mom. Make this while the local strawberries are available…it is a fleeting season.
1 1/4 cups all purpose flour mixed with 1 tsp salt
1 Tbsp + 1/4 cup raw sugar divided
4 Tbsp ice water
2 cups rinsed, hulled & halved small strawberries
2 Tbsp cornstarch
1/3 cup sliced almonds
1 egg beaten
Sanding sugar for garnish
Directions:
For this easy crust just put butter, flour-salt mixture & 1 Tbsp of the raw sugar in a food processor and pulse just until mixture is blended. Drizzle in ice water while pulsing mixture until a dough ball forms. Remove dough from processor, form into a ball and flatten. Wrap in plastic and chill for at least 30 minutes before rolling out.
Place halved berries and sliced almonds in a mixing bowl. Sprinkle cornstarch & remaining 1/4 cup raw sugar over & gently toss to coat berries. Set aside.
Preheat oven to 350 degrees.
Roll chilled dough out onto a lightly floured sheet of parchment paper into a rough circle about 15″ across.
Lift dough lined parchment paper and place on a sheet pan. It is okay if the dough hangs over the edges.
Pile strawberry filling in the middle of the dough circle and gently fold the edges up over the filling, leaving the center open. Brush dough with the beaten egg & sprinkle with sanding sugar.
Bake tart for about 40 -50 minutes, or until the crust is golden brown and the filling bubbly. Remove from oven & cool tart on pan set on a cooling rack. Serve warm or room temperature. This tart was very good for a few days and the bottom crust never got soggy!
(Recipe is based on one that I did for an editorial client earlier this Spring for a photo shoot. I, of course, made a number of changes to make it more user-friendly.)
…and a new Bundt pan…things do not always end up the way you plan…
…careful greasing, making sure I got into every crook, curve and cranny and the top of my cake still stuck in the pan! I really didn’t mind. I gently perched the pointed tops back on for this photo. The moist, just right sweetness, the fresh pears & golden polenta still tasted fantastic…that was really all I cared about. Life is not perfect, but delicious.
Perfectly-Imperfect Golden Polenta & Pear Bundt Cake
Preheat oven to 350 degrees. Grease a Bundt pan well.
In a mixing bowl whisk together the polenta, flour, baking soda & salt.
Using an electric mixer beat together the sugar, olive & canola oils, eggs & vanilla extract until pale yellow.
Add dry ingredients to mixture and beat on low just until combined. Fold in the pears & lemon zest.
Scrape batter into the prepared Bundt pan, gently tapping pan on counter to release any air pockets in the batter.
Bake for 1 1/2 hours, or until a skewer inserted into the middle of the cake comes out clean. Remove cake from oven and cool on a rack for 20 minutes. Turn cake out onto a dish and cool completely. Serve in slices warm or room temp. This cake is so moist that is good for a few days.
September crept in right on top of the last days of August…it has been tropical…. rainy and humid and hot, windy with bouts of unusually cool days scattered in between. Most of the local fruit is gone…the peaches, berries…plums and now my pears….adieu, adios and goodbye until next year sweet ones.
In the early dark days of fall and winter I will have my consolations on a shelf in my kitchen. A few jars of preserves…peach and plum. Jars of jam…pear and blueberry with a splash of St. Germain will be there, ready to comfort me.
Ripe and Ready.
The evening before I made this jam I cored, peeled and roughly chopped the pears and tossed them in a bowl with some raw sugar and lemon juice, covered the bowl and refrigerated the fruit overnight. The sugar and lemon juice help to pull some of the juices from the fruit, breaking the fruit down naturally which shortens the cooking process.
Do you know about “Pomona’s Universal Pectin”? I like to use this brand as the recipes for jams, jellies & preserves can be made with less sugar. I do not like cloying sweet preserved fruit so this pectin is just right. The instructions are easy to follow and there are plenty of recipes inside the package. It is preservative free, kosher, vegan, gluten-free and non-gmo. I usually buy it a Whole Foods, but it is available online at their site as well.
I had la few cartons of fresh blueberries left over from a photo shoot so I tossed them in with the peeled and chunked pears. The blueberries gave the finished jam a lovely soft color. A generous splash of St. Germain elderflower liqueur added another layer of goodness.
You always want to “test” your jam or jelly after cooking to make sure it “sets up”. I do this by spooning some of the mixture out onto a chilled plate. Leave it to sit a few minutes and then check the consistency. This batch “jammed” to perfection.
Every time I begin to can I feel like a novice….no matter how many times I have done it. This is where I am my most careful-self in the kitchen. I read the instructions, reread and double-check before starting. I gather all my canning supplies, pans, jars, ladles before hand and get everything cleaned, sterilized & all lined up ready to go. My best advice is just do what the recipe & canning instructions say…verbatim…all will be well.
Pkg of Pomona’s Universal Pectin (or other pectin if you prefer, most have easy, simple canning instructions inside the box. I used the directions for canning pears.
Equipment: clean 1/2 pint glass canning jars & lids, canning equipment (or if you prefer you can do this jam for the freezer…no hot water bath canning processing required.)
Directions:
The night before you plan to can, mix the pears, sugar & lemon juice in a mixing bowl, cover & refrigerate overnight.
The next day put the pear mixture in a large saucepan. Add 1 cup of water. Bring to a low boil. Add the pectin according to the package directions, turn stove to low simmer. Cook for about 30 minutes stirring often.
The last 10 minutes of cook time add the blueberries & St. Germain. Stir gently.
While fruit is cooking, wash & rinse canning jars in hot water. Set aside to drain on a very clean dish towel. Use new lids & rings. Put these in a pan of hot water until ready to use on low heat. There are many, many methods for hot water bath canning so use one that works for you.
When jam is almost finished cooking test the jell by spooning some jam mixture onto a chilled saucer, refrigerate for a few minutes. Test to see if the jam is the consistency you prefer. If not continue cooking another 15 minutes. Remove from heat.
Fill glass jars with hot jam mixture to within 1/4 inch from the top of the glass rim for hot water bath canning process, 1/2 inch for freezer jam. Wipe each jar rim clean before adding lids. When all jars are filled & wiped clean, top with lid and ring.
For hot water bath place filled jars into your canner rack, lower into the canning pan, cover jars with warm water covering by 1 inch. Bring to a boil, process for 10-15 minutes. Turn heat off. Raise jar rack out of the water bath & place jars on a cooling rack. As jam cools you should hear a soft “pop” as each jar seals. If some jars do not seal then refrigerate to use immediately.
For freezer jam after #6 let jars cool down completely & store in the freezer until ready to eat. Remove jars from freezer a few hours before using.
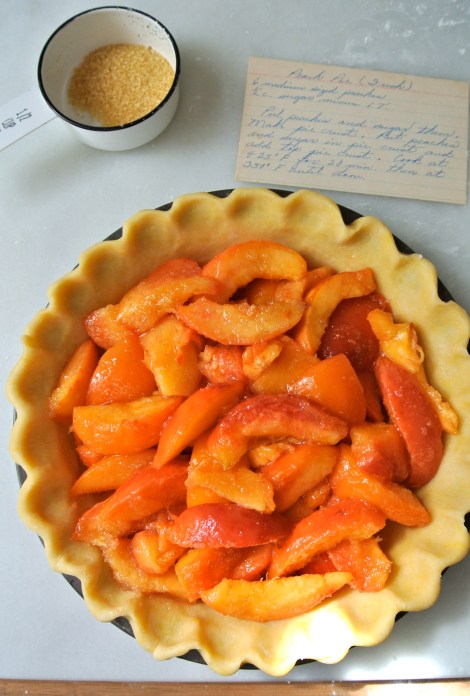
A few weeks ago I was rummaging around in an antique mall and found an old recipe box (see below) with each recipe carefully written out in old-fashioned beautiful “Cursive”. As you can see the box has been mended with tape multiple times and bears all the tell-tale signs of being much used. I fell in love with it.
Don’t you think it is beautifully interesting? Whose was it? Why does some daughter or son not have it in their kitchen right now? Whoever you are, or were, your recipe box is going to be well taken care of.
As I was looking through the recipes I noticed something interesting when it came to the desserts…cakes, pies, puddings. They all call for about half as much sugar as what I am used to seeing in newer recipes. Perhaps this was just particular to the owner of this box, perhaps someone in the family needed to watch their sugar intake, or maybe these dessert recipes are from a time where our palates had not become so used to “sugar overload”? I wanted to try this recipe for “Peach Pie (Fresh)” because it just sounded so simple and “fresh”.
What you will need to make this “Peach Pie (Fresh)”
6-8 fresh ripe peaches
1/2 cup raw sugar or white sugar + extra for dusting on top of the finished pie
1 pie crust for a double crust pie – 1 to line the pan + 1 for the lattice top (I used a wonderful slightly sweet pie dough recipe based on one found in Alisa Huntsman’s cookbook “Desserts from the Famous Loveless Cafe”(see end of blog for directions for this wonderful crust which I highly recommend.) If you do not “make pie crusts” then use a store-bought one dusted with a bit of powdered sugar.
Before we make the pie I am going to show you the easiest way in the world to peel a peach……
Cut an “X” in the bottom of each peach.Gently drop peaches into softly boiling water.Remove peaches from simmering water after about 2 minutes & quickly plunge into ice water.Using your fingers gently peel back peach skin from the bottom of each peach where you made the “X”. The skin will slip right off with just a bit of coaxing.
Now we will make our basic lattice topped “Peach Pie (Fresh)”.
1. Roll out and fit one of the pie crusts into the bottom of 8 or 9 inch regular pie pan somewhat “fluting” the sides if you like. Preheat oven to 425 degrees.
2. Cut peaches into wedges away from the pit & place in a bowl. You should about 6 cups of cut-up peaches for this pie. Add 1/ 2 cup white granulated sugar as the recipe calls for or raw sugar if you prefer. Toss the peaches & sugar together.
3. Fill bottom pie crust with sugared peaches & their juice.
4. Roll out 2nd/top crust to make the lattice. Cut into random strips with a sharp knife. Place the strips over the top of the peaches weaving them over and under each other in opposite directions. I do not even try to make my “lattice” tops perfect but a bit more artful and random which I think is prettier. As you may have guessed I am not a lover of perfection, just things that are perfectly, beautifully not perfect.
5. Tuck ends of lattice strips under the bottom crust edge and re-flute.
6. Place the uncooked pie on a parchment paper lined baking sheet. Dust with some additional sugar if desired, pop in the oven and bake for about 20 minutes. Turn oven down to 350 and cook for another 30 minutes or until the peaches are hot and bubbly and the crust is golden brown and crispy. Serve warm as is or with a scoop of ice cream.
Okay, now let me tell you a couple of things about this recipe. It was indeed not icky sweet nor “gloopy” as fruit pies can sometimes turn out with too much cornstarch. The bottom crust was not soggy, the top crust was flakey and over all this pie tasted like I think a peach pie should taste. This is how a fruit pie should taste…like the ripe fruit used complementing a flakey crust & just enough sugar to call it dessert. No soggy crust or gloopy-ness!
Here are a few other variations on this peach pie recipe I made with the extra dough…
“A Wee Fresh Peach & Blueberry Pie”
Made the same way with the addition of fresh blueberries & a cookie cutter cut out crust top in a little 6″ pie pan.
and…..”A Very, Very Wee Fresh Peach Pie”
Just fresh sugared peaches, pie crust leftovers rolled out in a 3 inch tartlet pan.
And here is how to make this very good pie crust. Thanks Alisa!
Here is my version of Alisa’s pie crust:
1. Measure 2 1/2 cups flour + 1/2 cup confectioner sugar into the bowl of a food processor. Pulse a couple of times.
2. Cut 1 1/2 stick of butter into small cubes & freeze for 5 minutes. Then sprinkle over the flour-sugar mixture & pulse a few times to mix in.
3. To the processor add 3 cold egg yolks & pulse again 3 or 4 times to blend somewhat.
4. To bring it all together drizzle 1/4 to 1/2 cup cold buttermilk or regular milk over the flour mixture through the feed tube of the processor until a dough ball begins to form. Remove dough & form into 4 dough balls flattened. Wrap each one with plastic & chill for 10 minutes before rolling out to make your pie crust.
Oh no!!!! we are finished yet…here’s a few tips for fitting your wonderful crust into your pie pan. Roll it, fold it in half…
…fold again…..place in pie pan with the point in the center….
…unfold the same way you folded…..
…flute or not, & fill.
Spider: [eating the peach] Mmmmm. Better than ladybugs.
I will bet most of you do not think of Blackberries and immediately think of Snakes…yes real live Snakes! Let me just say I am pretty crazy about freshly picked Blackberries, but not so crazy about snakes (sorry snake lovers). Why, you might ask, do I think of these two things simultaneously? Let me tell share with you a very short vignette….
….West Tennessee on a dry, dusty, hotter-than-Hades kind of day…lots of years ago when I was around 9 or 10…
I loved doing anything with my Grandmother (Granny) no matter if it was work or play. I always wanted to tag along. The wild blackberries hung heavy & ripe all around so it was time to go berry-picking, the wild kind not the kind of blackberries planted in neat rows. We were cautioned to wear “real shoes” & to take care when blackberry picking as snakes liked berry patches. This caution, along with many others doled out on such occasions, was met with a certain nonchalance on my part. Before this particular day, not after, nor since.
The sun was relentless as we began to pick around the outer edge of the very dense berry patch. At first reaching what was easy. But so very many large juicy black berries were just out of my reach a few feet into the patch. I wanted those berries. I boldly stepped forward with one foot lifted off the ground when I “felt” something move liquid smooth, quietly, directly beneath where I was about to plant my foot. I froze, foot midair. Looking down I saw the snake slithering, very large & fat right underneath my berries & my foot. I am convinced to this day that I did levitate, backwards, out of the berry patch. There is something very Biblical about levitation isn’t there? And Fruit? And Snakes?
I did not pick anymore berries that summer. I have picked since, I have bought many berries that others have picked, I am still pretty crazy about blackberries, but still not so much about snakes.
Here is a really easy not-so-sweet upside down cake that I made last Sunday using fresh local Blackberries picked by others, along with a few Pluots.
Here is what you will need to make this very dense moist gluten-free cake:
1/2 stick Butter, 1 pint of Blackberries, 2 Pluots (or plums or peaches), 1 cup Raw Sugar/Turbinado, 2 cups Bob’s Red Mill Gluten Free Cornbread Mix, 1 cup Almond Meal Flour, the zest of 1 Lemon, 3 eggs, 2 cups Buttermilk, Sliced Almonds
Here is how you make it:
1. Place a 10-12 inch cast iron skillet with the 1/2 stick of butter over medium high heat until the butter is browned. Remove skillet from heat & set aside to cool somewhat. Preheat oven to 375 degrees. Let me take a moment to say that if you do not have an iron skillet get one. A good seasoned cast iron skillet is just the best thing to use for all sorts of cooking. Lodge pre-seasoned cast iron skillets can be purchased very affordably on-line. I have many of their skillets in various sizes that I use daily. For this recipe I am using my Great Grandmother’s iron skillet which is amazing well seasoned and is one of the reasons this cake will slip right out of the pan after it is cooked with no sticking.
2. Slice Pluots & arrange in the bottom of the iron skillet over the browned butter. Sprinkle the Blackberries to cover bottom of skillet between & around Pluot slices.
3. In a large mixing bowl whisk together the cornmeal, almond flour & sugar. Add eggs & buttermilk & lemon zest. Blend until batter is smooth. Spread batter over fruit in the skillet. Sprinkle with a generous handful of sliced almonds.
4. Bake in 375 degree oven for about 30-40 minutes until golden brown & bubbly around the edges & set in the center. Let cake cool in the skillet for about 10 minutes.
5. The “reveal” of an upside down cake is always the fun part. Place a plate or platter larger than the skillet face down over the skillet & then quickly & carefully invert plate & skillet right side up.
See how easy that was?
The crunch of the cornmeal combined with the browned butter, lemon zest & almond flavors & not too much sugar meld to make a very satisfying breakfast cake. Dust with a bit of powdered sugar if desired.
Have you ever picked wild berries? Have you ever almost stepped on a snake? Do you connect foods you eat to events from your past?
After I posted this my friend Diane Stopford, a Dubliner, left me a comment and a link to a poem by Seamus Heaney “Blackberry Picking” which I wanted to share with you. Thanks Diane.
Is it possible to fall in love with an orange. I think so…it happened to me. I had a short love affair with a few blood oranges yesterday. Obsessed, I posed & photographed 7 little blood oranges for a good part of my day. Whole, cut, peeled, the peel itself, juiced, all together, separately…from the front, from the back, overhead, sideways.
Don’t you just love that color….a crimson red, a sexy red, a not-a-red-flannel nightgown red. This color takes my breath away…I am gobsmacked…I am enchanted. The colors of the planet Mars via National Geographic!
I couldn’t stop at posing these beautiful orbs…I needed to turn them into delicious drinkables for later & edibles for right now. So six of my blood oranges are presently becoming “Blood Orange-cello” and Jam…..more about those at a later date, and one very special little “red planet” was turned into four tartlets.
An easy & simple recipe for “Bloody Sweet Orange Tartlets”
1. Preheat oven to 350 degrees. Roll pie dough out into 4 thin circles & loosely fit into tart pans. Sprinkle each with 1 tsp of sugar. Place tart pans on a sheet pan & bake for about 6 minutes or until very lightly browned. Remove from oven.
2. In a small mixing bowl whisk together the softened cream cheese, 2 tbsp sugar & egg until smooth. Evenly divide filling between the 4 tart pans.
3. Place one slice of the blood orange on top of each filled tart & sprinkle with additional sugar. Bake for about 20-25 minutes until golden brown & puffy.
4. Eat warm from the oven if you can, but these little tarts are great the next day.
A Little Blood Orange Gallery:
Just in case you are interested:
Blood oranges’ red pigment, anthocyanin, is an antioxidant. The pigments begin accumulating in the vesicles at the edges of the segments and at the blossom end of the fruit, and will continue accumulating in cold storage after harvest. Due to its pigments the blood orange contain greater amounts of antioxidants than other oranges. Blood oranges have a unique flavor profile compared to other oranges, being distinctly raspberry-like in addition to the usual citrus notes.
It is so fine to have a special seasonal treat on a lazy Spring Sunday morning while working on the New York Times Crossword puzzle with a friend. This was one such morning and Wouter made us a favorite treat that his mother made for him using sweet, small strawberries as they come into season.
At first I thought “how fattening”, “how decadent”, but I, in my infinite quest to try new combinations of familiar foods, succumbed and had one of the most deliciously indulgent breakfasts. My crossword working buddy Terry Martin and I gobbled up these little treats on bread as it might be our last meal.
Wouter’s Quick and Easy Recipe for “SMSSBSB” Breakfast
1. Cut up fresh, small strawberries into thick slices. (Don’t even try this with the strawberries from the supermarket with the white centers! It will not taste the same.)
2. Take slices of a good whole grain or white bread and smear each slice lavishly with softened butter such as Kerrygold.
3. Cover butter with slices of berries and then using a fork slightly mash to gently release juices.
4. Sprinkle teaspoons of raw or turbinado sugar over berries and eat.
During local strawberry season, wherever you live, treat yourself and try this regardless of any diet or food issues you might have. This is Dutch Soul Food and should be enjoyed at least once by all.
As an afterthought I do think next time I will have a glass of chilled Prosecco, Cava or Champagne while gobbling these little open-faced berry sandwiches.
I have recently had mangoes on my mind. Right now they are very plentiful, the prices are at a seasonal low, there are at least two varieties in most local markets from Mexico and it seems that all the photo shoots I have worked on this month have had mangoes as part of the process. Mangoes in salsa, mangoes in cocktails, mango puree, mangoes as props.
I even took a photo of mangoes while in Mexico earlier this month!
Not one to waste this lovely fruit, I have been bringing home many of the leftover mangoes from photo shoots and working them into all my meals. Last night I added cut up mangoes pieces to a quinoa salad. This morning I simply peeled and ate the perfectly ripe fruit with some greek yogurt. Today with a few of these delicious mangoes remaining on my kitchen counter I felt some urgency to use them before they went from the “just right” to the “not so right” stage of ripeness. I was hot, sticky and tired from doing some yard work and wanted a cool-down drink for lunch. With some cold buttermilk in my refrigerator I concocted a lassi using mangoes & raw sugar.
Mango lassi
Mango lassi is most commonly found in India and Pakistan though it is gaining popularity worldwide. It is made from yogurt, milk or water and mango pulp. It may be made with or without additional sugar. It is widely available in UK, Malaysia and Singapore, due to the sizable Pakistani/Indian minority, and in many other parts of the world. In various parts of Canada, mango lassi is a cold drink consisting of sweetened kesar mango pulp mixed with yogurt, cream, or ice cream. It is served in a tall glass with a straw, often with ground pistachio nuts sprinkled on top.
“My Very Simple Mango-Buttermilk Lassi”
Ingredients:
2 cups peeled & cut up Mango; 1/4 cup raw sugar; 4 cups good buttermilk(I used fresh buttermilk from JD’s Dairy in Russelville, KY); ice cubes; mint leaves for garnish
To Make:
1. Peel and chop two or three ripe mangoes to make 2 cups.
2. Put chopped mango, buttermilk & raw sugar in a blender and puree until very smooth. Taste and adjust sweetness if desired.
3. Fill glasses with ice. Pour mango lassi over ice and add mint for garnish. This drink will cool you down, give you one of your daily fruit requirements as well as a dose of protein & calcium.
As I was drinking my lovely cool-down lassi I thought that it would probably have a very different yum factor with the addition of some dark rum. So be it! With just a few adjustments I created a new cocktail for warm Spring evenings, or late lunches!
“Mango-Rum Lassi Cocktail”
For this you make the mango lassi using the recipe above. You will also need: dark rum; additional raw sugar to rim the cocktail glass, mint and ice.
1. Rinse martini or other cocktail glass in cool water. Shake off excess moisture and turn glass with wet rim upside down in a saucer of raw sugar to coat rim. Pour about 1/2 to 1 ounce dark rum into martini glass.Add a few ice cubes. Pour mango lassi into glass to about 1/2 inch from rim. Garnish with mint. (Adjust alcohol according to your taste.)
A perfect cocktail. The ingredients are simple & easy to find. It is lovely to look at & refreshing. The crunchy raw sugar on the rim melds with the mango and rum flavors in a most delicious way.