An Apple Cake to Celebrate….Something! Anything!

dsc_0330

Here is what I think…or one of the millions of things I think….find something to celebrate. It can be a little thing or a big thing or nothing real at all, but some creative thing going on inside your head. Take some time to celebrate something. It can only be a good thing, right?

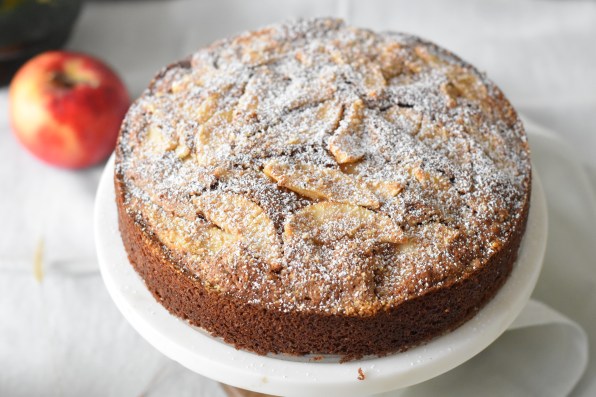
This apple cake is of my own invention to celebrate no one thing, but just the season, the beautiful apples I had, a few lovely soft orange rose hips,  some antique pieces recently acquired for props, the light coming in through the window on this particular day while I played with this still life. More than plenty to celebrate I think don’t you?

dsc_0338

dsc_0317

I made a wee cake and a larger cake..one to give away and one to enjoy.

dsc_0282

A dusting of powdered sugar always seems celebratory to me.

dsc_0298


An Apple Cake to Celebrate

dsc_0311

Ingredients:

  • 6 crisp, tart apples or whatever is your favorite, peeled, cored & thinly sliced
  • 1/2 cup raw sugar
  • 1/2 cup granulated sugar
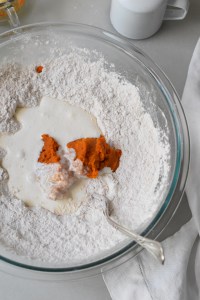
  • 1 1/2 cups Spelt flour, sifted
  • 2 teaspoons baking powder
  • 1 teaspoon apple pie spice
  • 1 tablespoon pure vanilla extract
  • 2 large eggs, lightly beaten
  • 1 stick unsalted butter, melted
  • 1/2 cup chopped blanched almonds
  • powdered sugar for dusting over top of finished cake

Directions:

  1. Preheat oven to 350 degrees. line the bottom of a 9 or 10 inch springform pan with parchment paper and then spray sides and bottom with cooking spray. Set aside.
  2. Toss together in a bowl the apple slices & 2 tablespoons of the granulated sugar. Set aside.
  3. Using a stand, or hand mixer, blend together the remaining granulated sugar, raw sugar, spelt flour, baking powder, apple pie spice, vanilla extract, eggs and butter.
  4. Fold in half the sugar-coated apples and spoon into the prepared springform pan. Top with remaining apple slices & chopped almonds.
  5. Bake for about 1 hour or until cooked throughout when tested with a skewer. Let cool in the tin for about 10 minutes then remove the sides and cool cake on a wire rack.
  6. Right before serving add a generous, celebratory, dusting of powdered sugar.

Note: Is delicious with a bit of whipped cream as well. If you decide to make a wee and larger cake like I did use a smaller 8 inch pan and an even smaller 6 inch pan. Worked great.

Teresa Blackburn   http://www.teresablackburnfoodstyling.com     http://www.foodofifth.com

Pumpkin-Maple Biscuits & Karma

dsc_0322

Last week I had a couple of projects going on at home from various clients…recipe developing and testing using canned pumpkin puree and as always happens I ended up with a can opened & partly used…what to do? I find it so hard to toss out food even though a large part of my job as a food stylist has to do with just that! This is the one part of being a food & photo stylist that is hard for me. I grew up in a blue-collar household, poor by today’s standards, and food was not wasted…ever. For some reason when we did not finish our food my Mother always brought up the starving children in India…why India I do not know…but it stuck and every time I toss out food I have that image in my head. Her point was made simply and straightforward.

By the last day of many photo shoots there is always food that has been too handled and left to sit out just too long while being photographed to be eaten. It has to be tossed and this always gives me pause. On the other hand, on most photo shoots we end up taking car loads of food to local food banks. I am hoping that cancels out my bad food karma turning it into good food karma.

So with a half can of leftover pumpkin puree and not wanting to toss into the trash bin,  I tossed it into one of my easy weekend morning go-to recipes for two, now three ingredient biscuits. Deliciously saved and reused.

dsc_0288

“The well” is my favorite part of biscuit-making…learned from my mother it always works to aid in making the most tender biscuits ever.

dsc_0290dsc_0294

Dry ingredients….using a fork…make “the well” by pushing the flour mixture up against the sides of the bowl creating a bowl or “well”. Add wet ingredients all at once…..

dsc_0295dsc_0302

….quickly stir together pulling the dry ingredients into the wet using a fork…don’t try to mix totally… gently and quickly make a “slaggy” dough….

dsc_0303dsc_0305

….dump out onto a lightly floured surface and knead a few times to meld wet and dry together to form a smooth dough…pat out into a circle…fold over and pat out again…repeat about 4 times…patting and folding and patting….

dsc_0307

…cut biscuits straight down…no twisting the cutter and spread out on parchment lined baking sheet…

dsc_0309

…brush tops with maple syrup and bake.

dsc_0317

Warm from the oven smeared with softened butter. Happy Weekend y’all.

dsc_0331

Pumpkin-Maple Biscuits

  • Difficulty: easy
  • Print

dsc_0331

Ingredients:

  • 2 1/2 cups self-rising flour
  • pinch of salt
  • 1 Tbsp pumpkin pie spice
  • 1 cup pumpkin puree
  • 1/4 cup maple syrup, divided
  • 3/4 cup whipping cream
  • softened butter for serving

Directions:

  1. Preheat oven to 400 degrees. Line a baking sheet with parchment paper.
  2. Mix together the flour, salt & pumpkin pie spice. Use a fork to make “a well” in the middle of the mixture.
  3. Add pumpkin puree, 2 tablespoons maple syrup & whipping cream. Using a fork, gently and quickly blend ingredients together. Your dough should not be totally blended.
  4. Dump out onto a work surface lightly dusted with flour. Using your hands fold and knead to create a smooth dough. Pat into a circle, fold over and pat out again and folding and patting out…repeat 4 times lastly patting dough out into a circle about 1/2-3/4 inch thick depending on how you like your biscuits.
  5. Cut out biscuits…taking care to not “twist” the cutter…just cut straight down. Place biscuits on parchment paper lined baking sheet.
  6. Brush tops with remaining 2  tablespoons maple syrup. Bake for about 15-20 minutes. Biscuits will be light and fluffy with a glazed top and are best eaten warm. They will keep up to one day and can be reheated.

Teresa Blackburn        www.teresablackburnfoodstyling.com